Saving Images in GIMP
So you've created your first image in GIMP. Now what?
You should save your image (before something happens and you lose your 2 minutes of hard work!)
When saving images, you need to decide which format you want to save the image in. Of course, there's nothing stopping you saving multiple copies of the image, each in a different format. In fact, I recommend keeping multiple copies of your image — especially if you are doing a lot of work on it.
In any case, you still need to understand which is the best format to use.
Saving your Image
In GIMP, the way you specify an image's format is to save it with the applicable extension.
For now, we'll save our image in XCF format (GIMP's native format). It's a good idea to have at least one copy of your image in native GIMP format. You might even create multiple copies, each at different stages of modification.
-
Launch the Save As Dialog
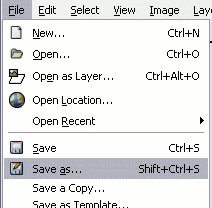
Select File > Save As...
-
Save the File
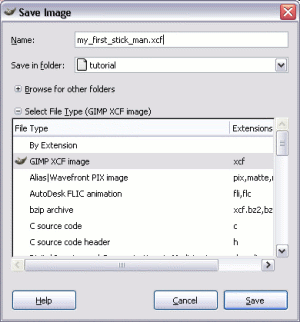
Once the dialog box pops up, enter an image name ensuring you use a .xcf extension.
Click Save.
Other File Types
To save file in another format (for example, GIF, JPEG, or PNG), use the File > Export As... option.
Older versions of GIMP (like in this screenshot) allowed you to do this from the Save As dialog box, but newer versions require you to export those file types.
Exporting Images
If you use the Export As... option to export a file to a different file type, depending on the file format you use, you may see another dialog box where you can enter values specific to the file format. In this case, you can either use the default values or adjust settings as required.
About .XCF Extension
GIMP's native format uses a .XCF extension. This is the best format to use if you intend to modify the image in the future.
By saving your file with a .XCF extension, you ensure that all image data (such as layers, channels, paths etc) is saved exactly how you created it. When you open it up again, you can continue from where you left off.
Saving for Web
There are two very important things to remember when creating graphics for the web:
- Keep the file size down
- Use the correct format
File Size
Graphics have the potential to be really big. I mean really big. The problem is that, if you don't know what you're doing, you might not notice how big the file size is. The graphic may look small on the screen but, if it's using a high resolution, its file size could be much larger than you need it to be. This could result in the image taking too long to download for your users to view.
If the image is only going to be displayed on the web (or computer screens), check that the image is displayed at the correct size when you view the image at 100% zoom.
Also check that you're using the correct color mode (eg, RGB, grayscale). Color images should be RGB. Black and white should be grayscale. To check this, go to Image > Mode. The current mode will be selected.
Correct Format
If you intend to use your image on a website or blog, you will need to save it in a format that web browsers recognize. The most common file formats to use for the web are GIF, JPEG, and PNG.
In general, JPEGs are best for complex images with lots of colors (such as photos). GIFs on the other hand, are better for images with flat colors (such as cartoon illustrations, logos etc). For examples of the difference between GIFs and JPEGs, see GIF vs JPEG.
PNGs can be used instead of GIFs in certain circumstances (small icons, line drawings etc), but check the file size — PNGs can grow quite large on larger, more complex images.
Other Supported Formats
GIMP supports many different file formats. You can see these formats whenever you go to export a file (using File > Export As....
Next, we look at the file formats supported by GIMP.